What are microgreens?
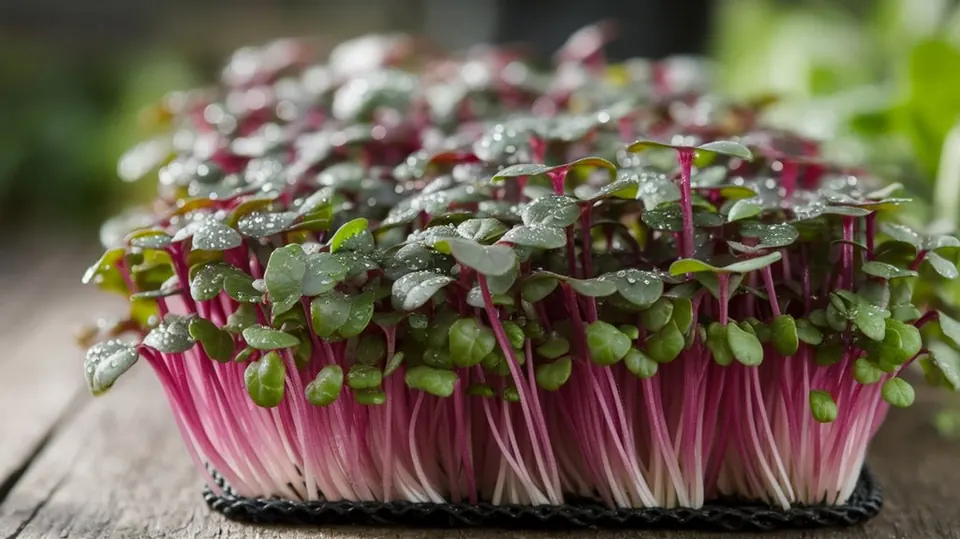
Microgreens are vegetables and herbs harvested as young seedlings. You sow the seed thickly in a shallow tray and let it grow for 1 to 3 weeks. Then you cut it once the first leaves have opened. These are the seed leaves, also called cotyledons. At this stage the plants are 1 to 3 inches (2.5 to 8 cm) tall.
You eat the stems and leaves, not the roots. That's one of the main ways microgreens differ from sprouts.
Almost any vegetable or herb can be grown this way. The most popular are sunflower, pea shoots, radish, broccoli, basil and arugula. Each tastes like a gentler version of the full-grown plant.
Microgreens vs sprouts vs baby greens
| Sprouts | Microgreens | Baby greens | |
|---|---|---|---|
| Grown in | A jar or tray, water only | A tray with soil or a mat, plus light | A garden bed or large tray |
| Ready in | 2–6 days | 7–21 days | 3–6 weeks |
| What you eat | The whole sprout, root and all | Stems and leaves, cut above the root | Leaves |
| Light needed | No | Yes | Yes |
| Flavour | Mild, crunchy | Strong, like the grown plant | Like the grown plant, milder |
For a detailed comparison, see microgreens vs sprouts.
Are microgreens good for you?
The best-known study comes from the USDA. In 2012, researchers measured vitamins in 25 kinds of microgreens. Many had more of these nutrients, gram for gram, than the grown leaves of the same plants. Red cabbage had the most vitamin C. Cilantro was highest in carotenoids, garnet amaranth in vitamin K, and green daikon radish in vitamin E.1
Two cautions keep this in perspective:
- Results vary a lot by crop. Some microgreens were far richer than others, so no single variety is "the" superfood.
- Portions are small. A garnish of microgreens adds less than a full serving of vegetables. They work best as a tasty way to eat more greens, not as a supplement.
Our guide to microgreens benefits has more on the research. The microgreens nutrition chart compares common varieties.
How to grow microgreens: the short version
- Soak large seeds like peas and sunflower for 4 to 8 hours. Small seeds like radish and broccoli usually go in dry.
- Sow thickly on 1 inch (2.5 cm) of moist soil or a grow mat in a shallow tray.
- Keep them dark for 2 to 4 days. Cover the tray with a second tray, often with a light weight on top. This "blackout" step helps roots grip and stems grow tall.
- Give them light. Move the tray to a bright window or under an LED light once the shoots lift the cover.
- Water from below once a day, then cut above the soil at 7 to 21 days, depending on the crop.
That's the whole routine. The full step-by-step guide covers each step, and the seeding chart tells you how much seed to use per tray.
What you need to start
- Seed: buy seed sold for sprouting or microgreens. It's fresh and isn't coated with fungicide. See our guide to microgreen seeds.
- Trays: two shallow trays, one with drainage holes and one without. The standard size is 10 × 20 inches, called a "1020." See 1010 vs 1020 trays.
- Growing medium: potting mix, coco coir or a hemp mat. See soil vs coco coir vs hemp mats.
- Light: a sunny window or a simple LED shop light. See do microgreens need grow lights?
- A spray bottle and sharp scissors.
Why grow microgreens at home?
- Fast. Most crops are ready in 1 to 3 weeks.
- Small. A single tray fits on a windowsill or a shelf.
- Year-round. Indoor trays don't depend on the weather.
- Fresh. Store microgreens often sit for days. Home-grown ones are cut minutes before you eat them.
- Good value. A tray of seed costs a fraction of the same weight of store microgreens.
Are microgreens safe to eat raw?
Microgreens are usually eaten raw. They're cut above the roots and grown with light and air. So they're usually seen as a lower risk than jar sprouts, which you eat whole. They still grow in warm, damp conditions, so clean habits matter: use clean trays, buy seed sold for sprouting or microgreens, water from below, cut above the soil and wash your harvest before eating.
Every microgreens guide on this site
Growing your first tray?
The step-by-step guide covers trays, soil, seeding, blackout, light, watering and harvest, with a day-by-day plan.